Blog

financial freedom budget

Financial Freedom Roadmap: Budgeting, Expense Mastery, and Emergency Fund Essentials

Financial stability is a fundamental aspect of a fulfilling life. It offers peace of mind, ensures you’re prepared for the unexpected, and helps you achieve your future goals. In this blog article, we’ll explore the essential steps to create a budget, manage your expenses effectively, and start saving for both your future and an emergency fund.

Creating a Budget

A budget is the cornerstone of sound financial management. It’s a roadmap that empowers you to control your money rather than letting it control you. Follow these steps to create a budget:

  1. Gather Financial Data: Collect information about your income, expenses, and financial goals. This includes pay stubs, bills, and any financial documents.
  2. Categorize Your Expenses: Divide your expenses into categories such as housing, transportation, groceries, entertainment, and savings. This helps you visualize where your money goes.
  3. Set Clear Goals: Establish short-term and long-term financial goals. Whether it’s saving for a vacation or retirement, having clear objectives will guide your budget.
  4. Track Your Spending: Keep tabs on every expenditure for at least a month. This helps identify areas where you can cut back.
  5. Create Your Budget: Using the gathered data, create a budget that allocates a specific amount to each spending category. Ensure your income exceeds your expenses.
  6. Review and Adjust: Regularly review your budget to ensure you’re staying on track. Adjust it as necessary to accommodate changes in your income or expenses.

Effective Expense Management

Once you have a budget in place, effective expense management is crucial for financial success:

  1. Prioritize Needs Over Wants: Distinguish between essential expenses (needs) and non-essential ones (wants). Prioritize your needs in your budget.
  2. Cut Unnecessary Expenses: Identify areas where you can cut back, like dining out less or cancelling unused subscriptions.
  3. Avoid Impulse Spending: Before making a purchase, ask yourself if it aligns with your budget and financial goals. Avoid impulsive buying.
  4. Use Cash or Debit: Paying with cash or a debit card can help you avoid accumulating credit card debt.
  5. Shop Smart: Look for discounts, use coupons, and compare prices when shopping. These small steps can add up to significant savings.

Starting to Save for the Future

Saving for the future is a vital aspect of financial planning. Here’s how to get started:

  1. Set Savings Goals: Determine what you’re saving for, whether it’s retirement, a down payment on a house, or a dream vacation.
  2. Automate Savings: Set up automatic transfers to a savings or investment account. This ensures you save consistently without having to think about it.
  3. Emergency Fund: Prioritize building an emergency fund with at least three to six months’ worth of living expenses. It provides a safety net for unexpected events.
  4. Use Tax-Advantaged Accounts: Consider using tax-advantaged accounts like a 401(k) or IRA for retirement savings. They offer tax benefits and can help your money grow faster.
  5. Invest Wisely: As your savings grow, consider investing in diversified portfolios to potentially earn higher returns over the long term.

Building an Emergency Fund

An emergency fund is your financial cushion when life throws unexpected challenges your way. Follow these steps to build one:

  1. Start Small: Begin by saving a small portion of your income, even if it’s just $10 or $20 per paycheck.
  2. Increase Over Time: Gradually increase your emergency fund until it covers at least three to six months’ worth of living expenses.
  3. Separate Account: Keep your emergency fund in a separate, easily accessible account, such as a high-yield savings account.
  4. Use Windfalls: Whenever you receive unexpected money, like a tax refund or a work bonus, consider directing a portion of it into your emergency fund.
  5. Only for Emergencies: Strictly use your emergency fund for genuine emergencies, like medical expenses, car repairs, or unexpected job loss.

Conclusion

Creating a budget, managing expenses effectively, and building an emergency fund are essential steps toward financial security and achieving your future goals. By following these practices consistently, you can take control of your finances, reduce stress, and work towards a brighter financial future. Remember, financial success is a journey, and every step you take brings you closer to your goals.

Mastering Google Site Kit: A Comprehensive Guide to Setup and Benefits

In the realm of website management, Google Site Kit stands as a powerful ally, offering an integrated solution to harness the capabilities of Google’s key tools. This plugin, designed specifically for WordPress users, empowers website owners to effortlessly connect with Google Analytics, Search Console, AdSense, and PageSpeed Insights. In this guide, we’ll delve into the intricacies of Google Site Kit, exploring its setup process and unveiling the remarkable benefits it brings to website optimization and performance tracking.

Table of Contents

  1. Understanding Google Site Kit
    • What is Google Site Kit?
    • Why is it essential for website owners?
  2. Setting Up Google Site Kit
    • Step 1: Install and Activate the Plugin
    • Step 2: Connect Your Google Account
    • Step 3: Choose Services to Connect
    • Step 4: Verify Your Site with Google
  3. Benefits of Google Site Kit
    • Streamlined Data Access
    • Comprehensive Performance Tracking
    • Enhanced SEO Insights
    • Monetization Opportunities
  4. Leveraging Google Site Kit for Better Website Management
    • Optimizing Content with Search Console Data
    • Tracking Site Traffic and Audience Engagement
    • Improving Page Load Speed with PageSpeed Insights
    • Maximizing Ad Revenue with AdSense Integration
  5. Real-World Examples: How Google Site Kit Transforms Websites
    • Case Study: SEO Boost through Comprehensive Insights
    • Case Study: Monetization Success with AdSense Integration
  6. Advanced Features and Future Prospects
    • Google Site Kit API Integration
    • Upcoming Enhancements and Features

7. Conclusion: Elevate Your Website Management with Google Site Kit

Understanding Google Site Kit

What is Google Site Kit?

Google Site Kit is a free WordPress plugin developed by Google. It acts as a bridge between website owners and essential Google tools. By connecting seamlessly with Google Analytics, Search Console, AdSense, and PageSpeed Insights, Site Kit empowers users to access valuable data and insights right from their WordPress dashboard.

Why is it Essential for Website Owners?

For website owners, Google Site Kit is a game-changer. It eliminates the need to switch between different tabs and logins to access crucial data. With Site Kit, you can now monitor your website’s performance, analyze user behavior, optimize content, and even explore monetization opportunities, all within your WordPress environment.

Setting Up Google Site Kit

Step 1: Install and Activate the Plugin

Begin by installing the Google Site Kit plugin from the WordPress dashboard. Once installed, activate it to initiate the setup process.

Step 2: Connect Your Google Account

Click on the “Start Setup” button and log in with your Google account. This connection ensures secure data transmission and integration.

Step 3: Choose Services to Connect

Select the Google services you want to integrate. This includes Google Analytics, Search Console, AdSense, and PageSpeed Insights.

Step 4: Verify Your Site with Google

After connecting services, Site Kit will guide you through the site verification process. This step ensures that you have ownership and access rights to the website.

Benefits of Google Site Kit

Streamlined Data Access

Gone are the days of jumping between tabs to access different data sources. Google Site Kit consolidates information, allowing you to view analytics, search performance, ad revenue, and site speed insights in one place.

Comprehensive Performance Tracking

Site Kit provides comprehensive insights into your website’s performance. From traffic sources to user engagement metrics, you can monitor the health of your site without leaving WordPress.

Enhanced SEO Insights

By integrating Google Search Console data, Site Kit offers a clearer understanding of how users discover your site. It highlights top-performing keywords, click-through rates, and search impressions.

Monetization Opportunities

For bloggers and website owners looking to monetize, Google Site Kit’s AdSense integration is invaluable. It lets you track ad performance, analyze revenue, and optimize ad placements—all from your dashboard.

Leveraging Google Site Kit for Better Website Management

Optimizing Content with Search Console Data

With insights from the Search Console, you can refine your content strategy. Identify underperforming keywords and capitalize on trending topics to attract more organic traffic.

Tracking Site Traffic and Audience Engagement

Google Analytics integration empowers you to understand your audience better. Analyze user behavior, session durations, and bounce rates to tailor your content to their preferences.

Improving Page Load Speed with PageSpeed Insights

Slow-loading pages can lead to high bounce rates. With PageSpeed Insights integration, you can identify performance bottlenecks and implement improvements for a better user experience.

Maximizing Ad Revenue with AdSense Integration

For website owners monetizing through AdSense, Site Kit presents an opportunity to track revenue trends, identify high-performing ad placements, and optimize ad performance.

Real-World Examples: How Google Site Kit Transforms Websites

Case Study: SEO Boost through Comprehensive Insights

A niche blog utilized Google Site Kit to refine its content strategy. By analyzing Search Console data, they identified keywords with high search volumes but low competition. This strategic approach resulted in a significant increase in organic traffic and engagement.

Case Study: Monetization Success with AdSense Integration

An e-commerce site integrated AdSense through Site Kit. By monitoring ad performance and experimenting with placements, they achieved a 30% increase in ad revenue within two months.

Advanced Features and Future Prospects

Google Site Kit API Integration

Google is working on expanding Site Kit’s capabilities by introducing API integrations. This will enable developers to create custom integrations and further enhance the plugin’s functionality.

Upcoming Enhancements and Features

Google is committed to improving Site Kit based on user feedback. Expect updates that enhance usability, offer new insights, and make website management even more efficient.

Conclusion: Elevate Your Website Management with Google Site Kit

Google Site Kit brings a new level of convenience and efficiency to website management. With seamless integration of essential Google tools, you can optimize content, monitor performance, and capitalize on monetization opportunities—all from your WordPress dashboard. By embracing this comprehensive solution, you empower your website with the insights and tools needed to thrive in the digital landscape. So, take the leap and experience the transformation that Google Site Kit can bring to your website’s management and success.

Understanding Canonical Tags: The Guide to Solving Duplicate Content Issues

If you’re a website owner or a content creator, you may have encountered the term “canonical tag” while dealing with SEO (Search Engine Optimization) and duplicate content issues. Canonical tags are powerful tools that help search engines understand which version of a web page is the preferred one when multiple URLs have similar or identical content. In this blog post, we will demystify the concept of canonical tags and provide you with clear examples to ensure you grasp the concept easily.

What is a Canonical Tag?

In simple terms, a canonical tag is a piece of HTML code that informs search engines about the preferred or canonical version of a webpage. It is used when similar or duplicate content appears on multiple URLs within the same website. By specifying the canonical URL, webmasters can ensure that search engines index the right page and avoid potential issues with duplicate content affecting their website’s rankings.

The Need for Canonical Tags

Duplicate content can lead to several problems for website owners. When search engines find identical or very similar content across multiple URLs, they might:

  1. Dilute SEO Efforts: Instead of ranking a single page higher, search engines might split the ranking signals across multiple duplicates, reducing the overall ranking potential.
  2. Confuse Search Engines: Without a canonical tag, search engines might have trouble determining the primary version of the content, leading to incorrect indexing and lower rankings.
  3. Impact User Experience: Users might end up on different versions of the same content, causing confusion and frustration, which can harm your website’s reputation.

Example of Canonical Tag Usage

Imagine you have an e-commerce website selling trendy shoes. You have individual product pages for each color of a particular shoe model. However, the product information, including the product description, specifications, and reviews, remains the same for all color variations.

Here are three URLs for the same shoe model in different colors:

  1. https://example.com/shoes/trendy-shoe-blue
  2. https://example.com/shoes/trendy-shoe-red
  3. https://example.com/shoes/trendy-shoe-yellow

Since the content is nearly identical for each page, you want to avoid potential duplicate content issues. To address this, you’ll include a canonical tag on each individual page, pointing to the preferred URL, which might be the blue version of the shoe in this case:

<link rel="canonical" href="https://example.com/shoes/trendy-shoe-blue">

Now, search engines will understand that the blue shoe version is the primary one, and they will consolidate ranking signals and index that page instead of treating each color variation as a separate entity.

Implementing Canonical Tags

Adding canonical tags to your web pages is relatively straightforward. Here’s how you can do it:

  1. Identify Duplicate Content: Analyze your website to find pages with similar or identical content.
  2. Choose the Preferred Version: Determine which version of the content you want to be the canonical version.
  3. Insert the Canonical Tag: In the <head> section of the non-canonical pages, add the canonical tag with the URL of the preferred version.
<link rel="canonical" href="URL-of-the-preferred-version">

Conclusion

Canonical tags are essential tools for website owners and SEO professionals to handle duplicate content issues and improve their website’s search engine rankings. By indicating the preferred version of a page to search engines, you ensure that your content gets indexed and ranked correctly, while avoiding potential confusion for users. Now that you understand the significance of canonical tags, you can take advantage of this simple yet powerful technique to enhance your website’s SEO and user experience.

How to create pages fast and easy in wordpress

through customize in WordPress

When you start blogging, you need pages or categories in WordPress to categorize your post or you may need to create a contact page, privacy policy page, disclaimer page, or affiliate disclosure page (if you are doing affiliate marketing).

You can create a page in WordPress Dashboard. Take a look below

When you create pages using WordPress dashboard it may take a little time but if you create pages using wordpress customize option you can create pages easily and fast take a look at screenshot below:

Just enter the name of the page and click on add and your page will be created. Create all the pages you need and edit them using elementor or wordpress editor.

Top 5 Indian YouTube Channels to Learn SEO and Digital Marketing Education + Bonus

In the rapidly evolving world of SEO and digital marketing, staying up-to-date with the latest strategies and techniques is crucial for success. Thankfully, there are several Indian YouTube channels that offer valuable insights and practical knowledge in these fields. In this article, we will explore the top 5 Indian YouTube channels dedicated to teaching SEO and digital marketing. These channels have amassed a substantial following and consistently provide high-quality content to help viewers enhance their online marketing skills.

  1. Channel Name: Neil Patel
    Views: Over 95 million
    Subscribers: 1 million+
    Review: Neil Patel is a renowned digital marketer and entrepreneur, known for his expertise in SEO. His channel offers a wealth of information on search engine optimization, content marketing, social media, and more. With a charismatic presentation style, Neil Patel breaks down complex concepts into easily understandable lessons, making it suitable for both beginners and experienced marketers.
  2. Channel Name: Digital Deepak
    Views: Over 12 million
    Subscribers: 100,000+
    Review: Digital Deepak, hosted by Deepak Kanakaraju, is a highly popular channel focused on digital marketing education. Deepak’s in-depth tutorials cover a wide range of topics, including SEO, content marketing, email marketing, and affiliate marketing. His channel stands out for its practical approach, providing actionable insights that viewers can implement to achieve real results in their marketing efforts.
  3. Channel Name: Sorav Jain
    Views: Over 15 million
    Subscribers: 100,000+
    Review: Sorav Jain’s YouTube channel is a treasure trove of digital marketing knowledge. With a focus on social media marketing, SEO, and personal branding, Sorav offers valuable tips, case studies, and interviews with industry experts. His channel is highly engaging, with visually appealing presentations and thought-provoking discussions on emerging trends and strategies in the digital marketing landscape.
  4. Channel Name: Ankur Aggarwal
    Views: Over 30 million
    Subscribers: 400,000+
    Review: Ankur Aggarwal’s YouTube channel provides comprehensive tutorials on various aspects of digital marketing. From SEO and content creation to Facebook ads and Google Analytics, Ankur covers a wide range of topics. With a structured approach and clear explanations, his videos are beginner-friendly and offer step-by-step guidance for implementing digital marketing techniques effectively.
  5. Channel Name: Harsh Agrawal, ShoutMeLoud
    Views: Over 35 million
    Subscribers: 200,000+
    Review: Harsh Agrawal’s channel, associated with the renowned blog ShoutMeLoud, offers a wealth of information on SEO, blogging, WordPress, and affiliate marketing. Harsh’s expertise and experience shine through his tutorials, which are filled with practical tips, case studies, and industry insights. With a focus on monetization strategies, his channel provides valuable guidance for aspiring bloggers and digital marketers.

Bonus:

WS Cube Tech : Over 40 million Subscribers: 1.2 million+

Review: The ws cube tech YouTube channel focuses on various aspects of digital marketing, including SEO, PPC, social media marketing, and more. With a diverse range of tutorials and practical tips, the channel aims to educate viewers on the latest trends and strategies in the digital marketing landscape. The videos on the channel are well-presented and offer actionable insights, making it a valuable resource for individuals looking to enhance their digital marketing skills.

Conclusion:

These top 6 Indian YouTube channels dedicated to SEO and digital marketing education have garnered millions of views and substantial subscriber bases. From Neil Patel’s comprehensive approach to Digital Deepak’s practical tips, Sorav Jain’s insights, Ankur Aggarwal’s structured tutorials, and Harsh Agrawal’s expertise, these channels offer valuable resources to enhance your knowledge and skills in the digital marketing landscape. Whether you’re a beginner or an experienced marketer, subscribing to these channels will provide you with actionable strategies and valuable insights to excel in the dynamic world of SEO and digital marketing.

Categories SEO

10 Free SEO Tools: Enhance Your Website’s Performance without Breaking the Bank

Search Engine Optimization (SEO) plays a crucial role in driving organic traffic to your website and improving its visibility on search engine result pages. While there are numerous paid SEO tools available in the market, not everyone has the budget to invest in them. The good news is that there are several free SEO tools that can help you optimize your website and boost its performance. In this article, we will explore 10 powerful free SEO tools, highlighting their benefits, features, and pricing models.

Google Search Console:

Pros:

  • Provides valuable insights into your website’s performance in Google search results.
  • Helps identify and fix technical issues that may impact your website’s ranking.
  • Offers data on search queries, backlinks, indexed pages, and more.
  • Free to use with no premium features or pricing tiers.

Cons:

  • Limited to Google search data, excluding other search engines.
  • Requires some technical knowledge to utilize its full potential.

Google Analytics:

Pros:

  • Provides comprehensive website analytics, including traffic sources, user behavior, and conversions.
  • Offers valuable data to make data-driven decisions and improve website performance.
  • Integrates with other Google tools for a holistic view of your online presence.
  • Free to use with advanced features available in the premium version (Google Analytics 360).

Cons:

  • May require time and effort to set up and configure correctly.
  • Some advanced features are only available in the premium version.

Yoast SEO:

Pros:

  • A popular WordPress plugin that helps optimize content for better search engine rankings.
  • Provides real-time suggestions for improving SEO, readability, and keyword usage.
  • Generates XML sitemaps for easier search engine crawling.
  • Free version is available with premium features in the paid version (Yoast SEO Premium).

Cons:

  • Limited functionality compared to paid SEO tools.
  • Some advanced features require a premium subscription.

MozBar:

Pros:

  • A browser extension that provides on-page SEO insights and metrics.
  • Analyzes page elements, domain authority, and backlink profiles.
  • Allows quick competitor analysis and keyword research.
  • Free version available with additional features in Moz Pro subscription.

Cons:

  • Some features are only available with a paid subscription.
  • Limited functionality compared to full-scale SEO platforms.

Ubersuggest:

Pros:

  • Offers keyword research, competitive analysis, and backlink data.
  • Provides content ideas and suggestions for SEO optimization.
  • User-friendly interface with detailed metrics for effective decision-making.
  • Offers a free version with a premium subscription for more advanced features.

Cons:

  • Some advanced features are only available in the paid version.
  • Limited access to historical data in the free version.

Screaming Frog SEO Spider:

Pros:

  • Crawls your website to identify technical SEO issues.
  • Provides detailed reports on broken links, duplicate content, and missing meta tags.
  • Offers valuable insights for on-page optimization.
  • Offers a free version with limited functionality and a paid version for enhanced features.

Cons:

  • Free version has limitations in terms of the number of pages crawled.
  • Requires installation on a computer for usage.

SERPs Rank Checker:

Pros:

  • Helps track your website’s keyword rankings on search engine result pages.
  • Offers keyword suggestions, search volume, and competition data.
  • Provides insights into your website’s visibility and performance.
  • Free to use with a paid version available for additional features.

Cons:

  • Limited functionality compared to dedicated rank tracking tools.
  • May not provide data for all search engines.

Answer the Public:

Pros:

  • Generates content ideas by providing popular search queries and questions related to a topic.
  • Helps optimize content for user intent and long-tail keywords.
  • Provides insights into what users are searching for in your niche.
  • Offers a free version with limited searches per day.

Cons:

  • Limited functionality compared to comprehensive keyword research tools.
  • May require additional tools for in-depth keyword analysis.

Google Trends:

Pros:

  • Helps identify trending topics and search patterns.
  • Provides insights into keyword popularity and seasonality.
  • Allows you to compare keyword performance and regional interest.
  • Completely free to use with no premium versions.

Cons:

  • Limited to Google search data.
  • May not provide detailed keyword analysis compared to dedicated tools.

GTmetrix:

Pros:

  • Analyzes your website’s performance and page load times.
  • Provides insights into areas for improvement, such as image optimization and caching.
  • Allows you to compare your website’s performance against competitors.
  • Offers a free version with advanced features available in the paid version.

Cons:

  • Limited to website performance analysis, excluding other SEO aspects.
  • Some advanced features require a paid subscription.

Conclusion:

These 10 free SEO tools offer valuable insights and functionalities to enhance your website’s performance and visibility in search engine results. While they may have certain limitations compared to paid tools, they provide an excellent starting point for optimizing your website without the need for a substantial budget. From Google Search Console and Google Analytics to Yoast SEO and Ubersuggest, these tools cover a range of SEO aspects, including technical optimization, keyword research, content optimization, and performance analysis. By utilizing these free SEO tools, you can take significant strides in improving your website’s SEO and driving organic traffic to achieve your online goals.

Categories SEO

Fashion Blogging Secrets Revealed: From Novice to Influencer in No Time!- 2023

Fashion blogging has emerged as a dynamic and influential platform, connecting individuals with a passion for fashion to a global audience. With the power to inspire and influence trends, fashion bloggers have established themselves as tastemakers within the industry. If you’re eager to embark on your fashion blogging journey, this guide will provide you with a step-by-step approach on how to get started, grow your knowledge, and ultimately turn your passion into a fulfilling career.

I. What is Fashion Blogging?
Fashion blogging is the art of creating and curating content that revolves around the world of fashion. It involves sharing personal style, fashion trends, outfit inspirations, beauty tips, shopping hauls, runway reviews, and more through a dedicated online platform such as a blog or social media channels.

Pros:

  1. Creativity and self-expression: Fashion blogging allows you to showcase your unique style and creativity to a wide audience.
  2. Influence and impact: Fashion bloggers have the power to inspire and shape trends, influencing the fashion choices of their followers.
  3. Networking opportunities: By connecting with brands, fellow bloggers, and industry professionals, you can expand your network and open doors to exciting collaborations.

Cons:

  1. Competitive landscape: The fashion blogging space is highly competitive, requiring dedication, consistency, and a distinct voice to stand out.
  2. Initial investment: Building a successful fashion blog may require investing in photography equipment, website design, and attending fashion events.
  3. Time commitment: Maintaining a blog demands consistent effort in creating quality content, engaging with followers, and staying up-to-date with the latest trends.

II. How to Start Fashion Blogging:

  1. Define your niche: Determine your unique fashion perspective, whether it’s street style, luxury fashion, sustainable fashion, plus-size fashion, or a blend of different styles.
  2. Choose your platform: Select a blogging platform like WordPress or Blogger to host your blog or consider leveraging social media platforms like Instagram or YouTube.
  3. Create a compelling brand identity: Develop a visually appealing blog design, select a memorable blog name, and create a captivating logo that represents your brand.
  4. Invest in quality visuals: Invest in a good camera or smartphone with high-resolution capabilities to capture stunning visuals. Visual content is a crucial aspect of fashion blogging.
  5. Craft engaging content: Write informative, engaging, and authentic blog posts that cater to your target audience’s interests. Share your personal experiences, style tips, and fashion-related insights.

III. Who Can Start Fashion Blogging?
Fashion blogging is open to anyone with a passion for fashion, regardless of age, gender, or location. Whether you’re a student, working professional, or a fashion enthusiast looking for a creative outlet, fashion blogging offers an inclusive space for self-expression.

IV. What Knowledge Do You Need?

  1. Fashion trends and history: Stay updated on the latest fashion trends, designers, and historical fashion references to provide valuable insights to your audience.
  2. Personal style development: Cultivate your own unique style and experiment with different looks to establish a signature aesthetic that sets you apart.
  3. Content creation and curation: Hone your writing skills, learn basic photography techniques, and develop an eye for selecting visually appealing content.
  4. Digital marketing and SEO: Familiarize yourself with search engine optimization (SEO) techniques to ensure your blog gains visibility and attracts organic traffic.
  5. Social media and community engagement: Understand social media platforms, trends, and how to engage with your audience effectively.

V. How to Grow Knowledge About Fashion:

  1. Stay updated with fashion publications: Read fashion magazines, blogs, and follow fashion news outlets to keep yourself informed about the latest trends, collections, and industry updates.
  2. Attend fashion events and shows: Participate in fashion weeks, exhibitions, and local fashion events to gain firsthand experience and expand your industry connections.
  3. Engage in fashion courses and workshops: Enroll in online courses or workshops offered by fashion institutions or industry experts to enhance your knowledge of fashion theory, styling, and trends.
  4. Network with industry professionals: Attend fashion conferences, join fashion-related communities, and actively engage with professionals to gain insights and build relationships.

VI. How to Make Fashion Blogging a Career:

  1. Collaborate with brands: As your blog gains traction, brands may approach you for collaborations, sponsored posts, or affiliate partnerships, allowing you to monetize your blog.
  2. Create additional revenue streams: Consider diversifying your income by launching fashion-related products, offering styling services, or leveraging affiliate marketing programs.
  3. Build a strong personal brand: Consistently deliver quality content, engage with your audience, and establish yourself as a trusted voice in the fashion industry.
  4. Seek professional opportunities: Explore freelance writing, styling, consulting, or brand ambassador roles within the fashion industry to further establish your expertise.

Some fashion trends

Image Credits: Panaprium

Certainly! Here are a few well-known fashion bloggers who have made a significant impact in the industry:

  1. Chiara Ferragni – The Blonde Salad: Chiara Ferragni is one of the most influential fashion bloggers in the world. She started her blog, The Blonde Salad, in 2009 and has since built a global brand. Chiara’s blog covers a wide range of fashion topics, from street style to luxury fashion, and she has collaborated with numerous high-end brands.
  2. Bryanboy – Bryanboy.com: Bryan Grey Yambao, known as Bryanboy, is a Filipino fashion blogger who gained recognition for his unique and flamboyant style. With his bold fashion choices and witty commentary, Bryanboy has become a respected voice in the fashion industry. He has worked with major fashion brands and has a massive social media following.
  3. Aimee Song – Song of Style: Aimee Song is a Los Angeles-based fashion blogger who started her blog, Song of Style, in 2008. Known for her effortless California style, Aimee has successfully transitioned from blogging to becoming a published author and a fashion designer. She has collaborated with top brands and has been featured in major fashion publications.
  4. Danielle Bernstein – WeWoreWhat: Danielle Bernstein is the founder of WeWoreWhat, a popular fashion blog that showcases her personal style and fashion inspirations. She has built a loyal following and expanded her brand to include a swimwear line and collaborations with notable fashion brands.
  5. Camille Charrière – Camille Over the Rainbow: Camille Charrière is a French-born, London-based fashion blogger known for her chic and sophisticated style. Her blog, Camille Over the Rainbow, offers a blend of fashion, lifestyle, and travel content. Camille has collaborated with luxury brands and has become a sought-after fashion influencer.

These fashion bloggers have successfully established their unique voices, grown their knowledge of the fashion industry, and turned their passion into successful careers. They serve as inspirations for aspiring fashion bloggers, showcasing the potential and possibilities within the fashion blogging realm.

Conclusion:
Fashion blogging provides a platform for individuals to share their unique fashion perspectives, engage with a global audience, and potentially turn their passion into a career. By following the steps outlined in this guide, continuously expanding your knowledge, and staying true to your authentic voice, you can embark on a successful fashion blogging journey. Remember, consistency, creativity, and a genuine connection with your audience will be key to achieving your goals in the ever-evolving world of fashion blogging.

A Beginner’s Guide to Testing and Optimizing Your Website Speed for Mobile

Title: A Beginner’s Guide to Testing and Optimizing Your Website Speed for Mobile

Introduction:
In this beginner-friendly guide, we will explore the importance of testing and optimizing your website speed for mobile devices. We’ll discuss why a fast-loading mobile website is crucial, provide practical solutions to improve performance, and introduce some user-friendly tools to help you along the way.

Table of Contents:

  1. Why Your Mobile Website Speed Matters
    1.1 Meeting User Expectations
    1.2 Boosting User Experience and Conversions
  2. How to Test Your Mobile Website Speed
    2.1 Why Mobile-Specific Testing is Important
    2.2 Key Metrics to Evaluate Mobile Performance
  3. Optimizing Your Mobile Website Speed
    3.1 Mobile-Friendly Design and Responsive Layout
    3.2 Reducing File Sizes and Requests
    3.3 Caching and Compression Techniques
    3.4 Prioritizing Important Content
    3.5 Optimizing Images and Media
    3.6 Minimizing Third-Party Scripts and Integrations
  4. Tools to Test and Improve Mobile Website Speed
    4.1 Google PageSpeed Insights
    4.2 WebPageTest
    4.3 Lighthouse
    4.4 Pingdom Website Speed Test
    4.5 GTmetrix
  5. Real-World Examples of Mobile Website Optimization
    5.1 Example 1: E-Commerce Website
    5.2 Example 2: News Website
    5.3 Example 3: Service-Based Website
  6. Conclusion
  7. Why Your Mobile Website Speed Matters

1.1 Meeting User Expectations:
Mobile users expect websites to load quickly on their smartphones or tablets. If a mobile website takes too long to load, users may become frustrated and leave. It’s important to provide a fast-loading experience to meet user expectations.

1.2 Boosting User Experience and Conversions:
A slow mobile website can lead to a poor user experience, causing visitors to leave and reducing the chances of conversions. On the other hand, a fast mobile website enhances user satisfaction, encourages engagement, and increases the likelihood of achieving desired goals.

  1. How to Test Your Mobile Website Speed

2.1 Why Mobile-Specific Testing is Important:
Mobile devices have unique limitations, such as smaller screens and variable network conditions. It’s crucial to perform mobile-specific testing to identify performance issues that are specific to mobile devices and ensure an optimal user experience.

2.2 Key Metrics to Evaluate Mobile Performance:
When testing your mobile website speed, consider the following important metrics:

  • Time to First Byte (TTFB): Measures the server’s initial response time.
  • First Contentful Paint (FCP): Indicates when the first content appears on the screen.
  • Largest Contentful Paint (LCP): Measures the time it takes to render the largest content element.
  • Cumulative Layout Shift (CLS): Reflects the visual stability of the page during loading.
  • Total Blocking Time (TBT): Measures the time the page is unresponsive due to blocking tasks.
  1. Optimizing Your Mobile Website Speed

3.1 Mobile-Friendly Design and Responsive Layout:
Ensure your website has a mobile-friendly design and a responsive layout that adapts to different screen sizes. This eliminates the need for users to zoom or scroll excessively and improves mobile usability.

3.2 Reducing File Sizes and Requests:
Optimize CSS, JavaScript, and HTML files to reduce their sizes. Compressing images and using techniques like lazy loading can also help minimize file sizes and reduce the number of requests made to the server.

3.3 Caching and Compression Techniques:
Leverage browser caching to store static resources locally, reducing the need for repeated requests. Apply compression techniques like Gzip to reduce the size of transferred data and speed up loading times.

3.4 Prioritizing Important Content:
Load important content above the fold first, allowing users to interact with the page quickly. By deferring non-essential elements, you can enhance the perceived performance of your mobile website.

3.5 Optimizing Images and Media:
Compress and resize images to reduce their file sizes without compromising quality. Consider using modern image formats like WebP. Implement lazy loading for media content to load them only when necessary.

3.6 Minimizing Third-Party Scripts and Integrations:
Evaluate the necessity of each third-party script and integration on your mobile website. Minimize their usage or load them asynchronously to prevent them from impacting performance negatively.

  1. Tools to Test and Improve Mobile Website Speed

4.1 Google PageSpeed Insights:
Google PageSpeed Insights provides reports and recommendations to improve mobile and desktop website performance. It offers actionable insights to optimize your site for better speed.

4.2 WebPageTest:
WebPageTest allows you to test your website’s performance from different locations, devices, and network conditions. It offers detailed waterfall charts and performance metrics, helping you identify areas for improvement.

4.3 Lighthouse:
Lighthouse, an open-source tool from Google, audits your website’s performance, accessibility, SEO, and more. It provides easy-to-understand reports and practical recommendations for optimizing your mobile website.

4.4 Pingdom Website Speed Test:
Pingdom Website Speed Test analyzes your website’s speed, providing performance grades and detailed waterfall charts. It offers suggestions to enhance your mobile website’s performance.

4.5 GTmetrix:
GTmetrix offers a suite of performance testing tools, giving you insights into your website’s speed and optimization recommendations. It provides performance scores and video playback of page loading.

  1. Real-World Examples of Mobile Website Optimization

5.1 Example 1: E-Commerce Website:
By optimizing their mobile website, an e-commerce company reduced their page load time from 6 seconds to 2 seconds. This resulted in a 20% increase in mobile conversions and a significant decrease in bounce rates.

5.2 Example 2: News Website:
A news website improved their mobile speed by optimizing images and minimizing CSS and JavaScript files. This led to a 15% decrease in bounce rates and a 30% increase in average time spent on the website.

5.3 Example 3: Service-Based Website:
Through mobile-specific performance optimizations, a service-based website achieved a 50% decrease in page load time. This resulted in a 25% increase in mobile traffic and improved overall user satisfaction.

Conclusion:
Optimizing your website speed for mobile is crucial to meet user expectations, improve user experience, and boost conversions. By following the solutions outlined in this beginner-friendly guide and utilizing helpful testing tools, you can ensure your mobile website loads quickly and efficiently, providing an exceptional experience for your visitors.

Categories SEO

Take Screenshot in Snapchat / Screenshot Restricted Apps / Screenshot Not Allowed in Android – 2023

Screenshots 🙂

Screenshots are significant parts of our daily lives. If we need any info for later we swipe our fingers across the screen and click you got the screenshot. you can easily share it with your friends. Or there is any info that you need for later ;).

What if app doesn't allow screenshot?

Some apps doesn’t allow screenshots it maybe for some security reasons. For example Paytm doesn’t allow screenshots of payment done but give a Share button to share it. Also you can turn off the setting in app settings. But Recently Cred added the same feature and now it doesn’t allow taking screenshots of transaction and i need to share the payment screenshot with my landlord otherwise I’ll be out of the house. So what is the solution?, 

Also there are some Apps like Snapchat which allow screenshots but snitch it to the sender. So what is the solution for that.

Is there any solution for this?

Yes, why else I would write this article [Clickbait]

So for this, You need the Ingredients below:

1 android mobile

1 app [I’ll tell you]

1 windows laptop or tab which supports exe files [i’tell you]

700gm. Josh to do something suspicious.( Trust me you are not gonna solve world problem using this)

Download the Ingredients below

Screenshot for your reference

First of all your internet network must be the same in both mobile and laptop. 

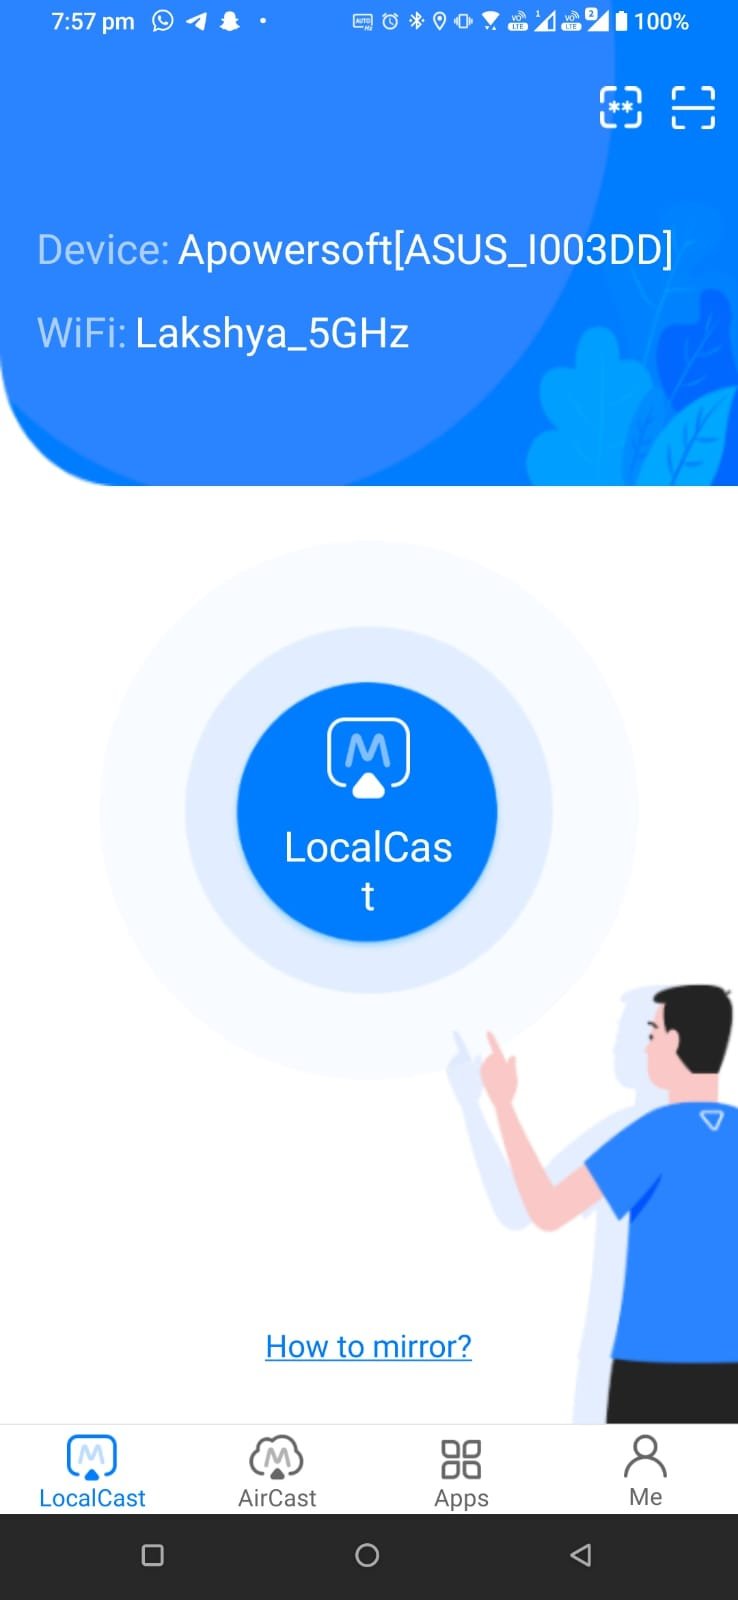
Let's Set Up the PC First

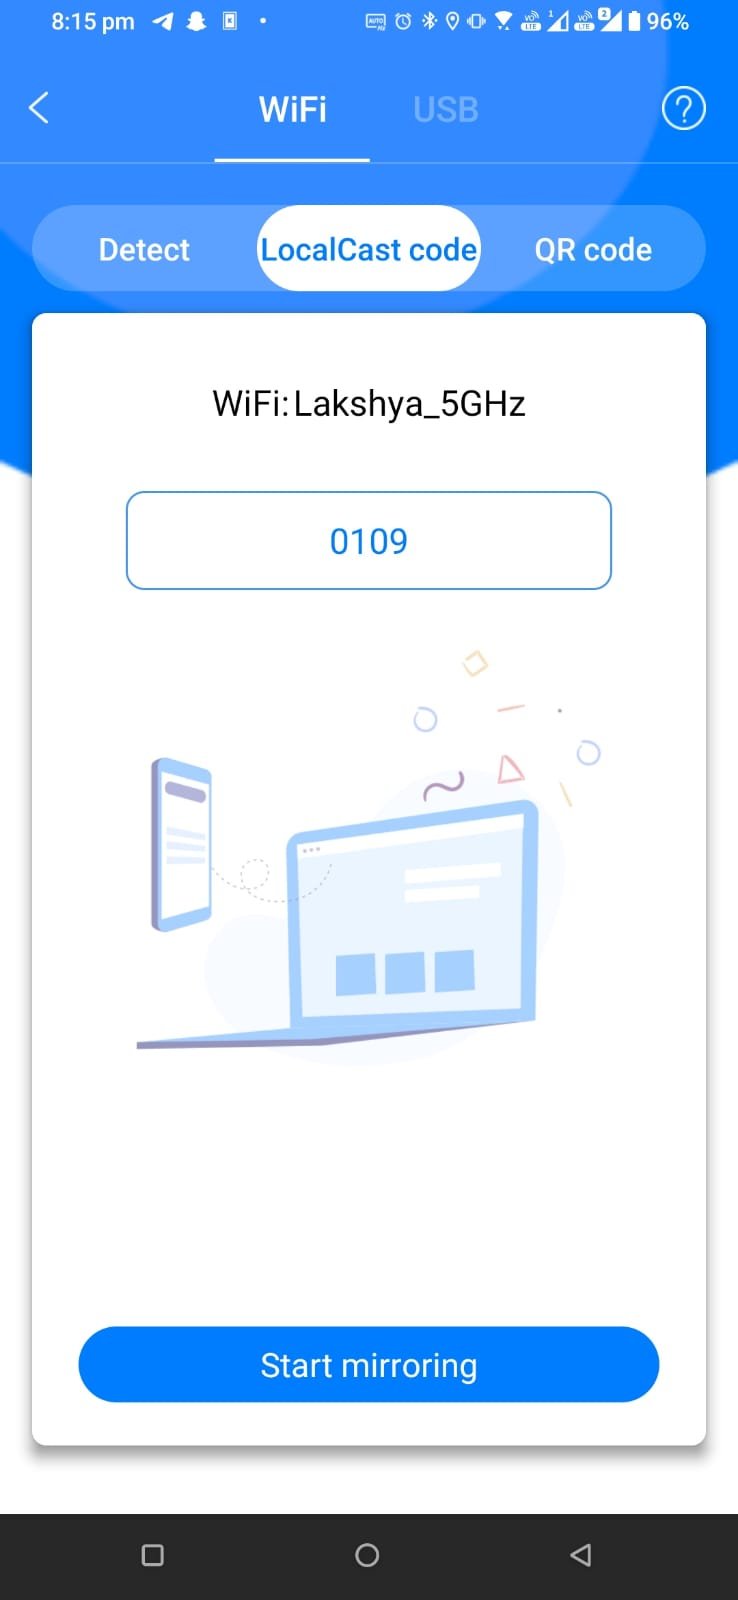
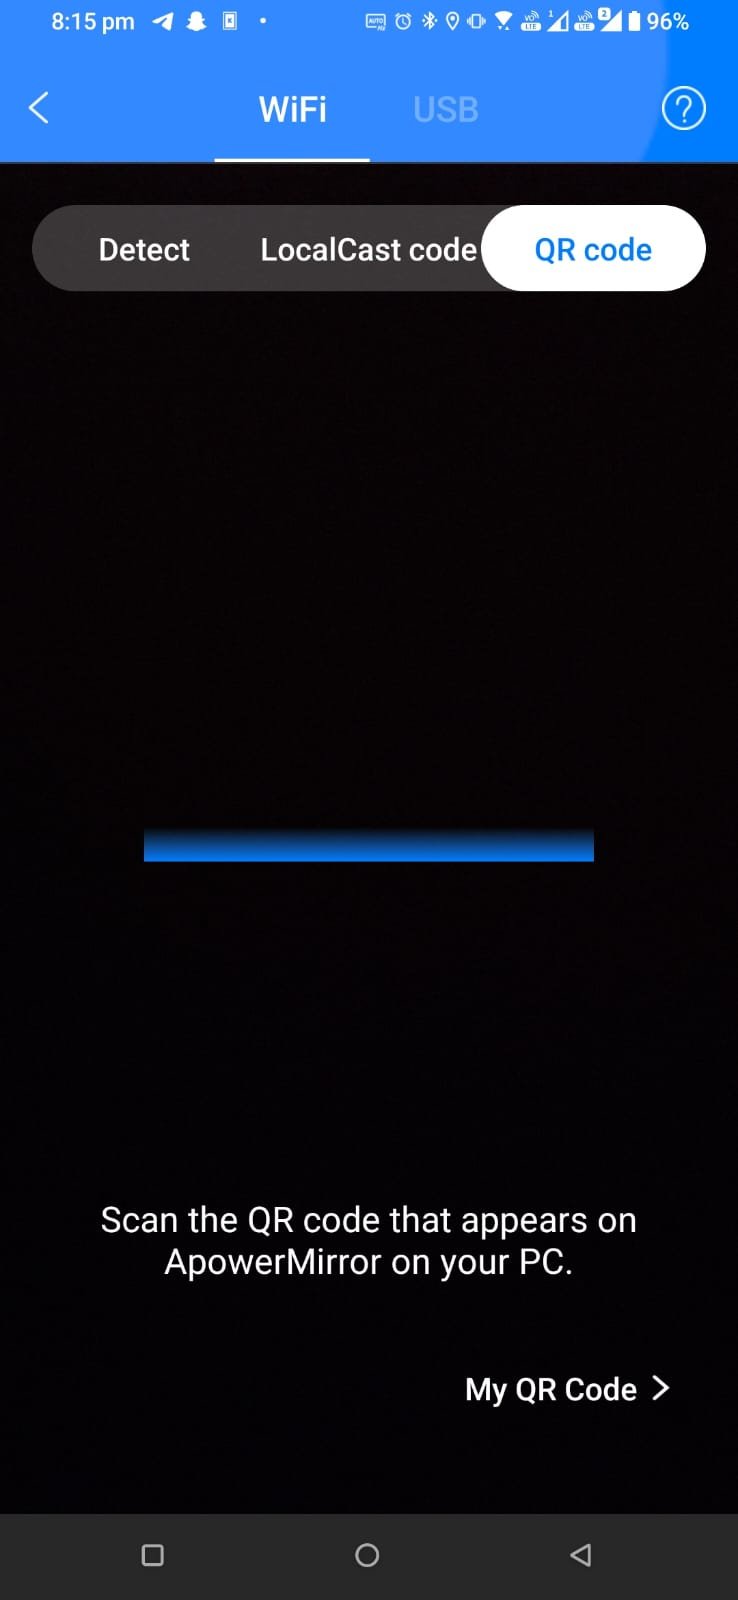
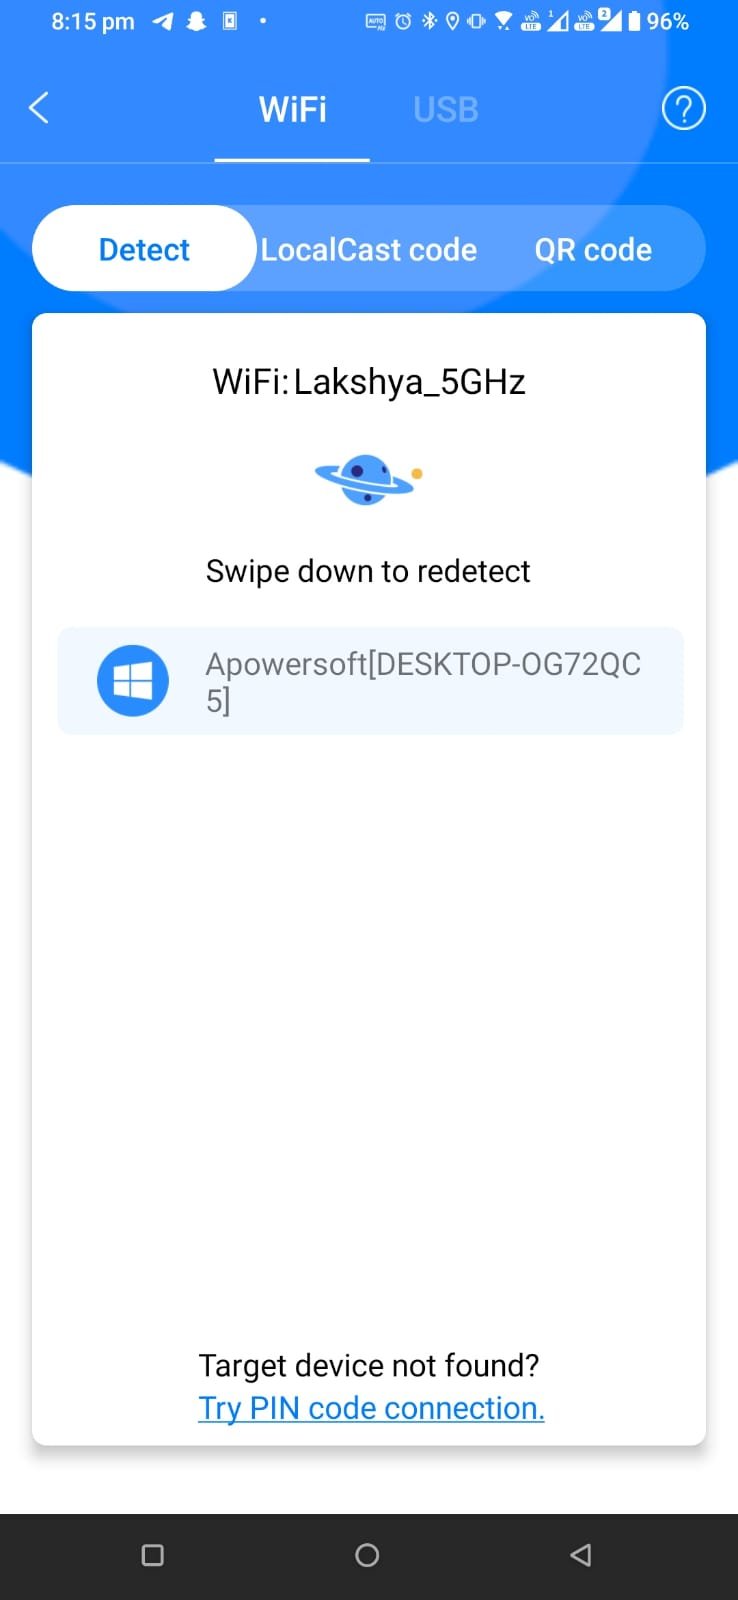
Now Let's Set Up the Mobile

As Soon as you allow your Phone your mobile screen will show up in your PC like below

As you see your mobile screen open in PC click on the camera icon to take a screenshot and video icon to take a video.

The default location for screenshots is: C:\Users\laksh\Documents\Apowersoft\Windows ApowerMirror

You can change the location file format and more in the settings menu.

If you are using the free version there is a limit of 10 minutes for use. Go limitless when you buy this software.

The software is premium. Please buy this as it will help the developers to improve and they won’t sleep hungry.

How Did I Came to Know About this.

It was on 6th November 08:24 pm when I Paid the rent using CRED and I send the payment screenshot to my Landlord but Cred was not allowing screenshots. So I started doing some research and I found two ways One was using OBS and Capture card. Second was using APower Mirror which was easy and convenient. 

Caution: This Article is just for education purpose. This article or website doesn't take any responsibility for Whatever you do. I just use this to take screenshots of payment app which don't allow. I can't post those screenshot for obvious reasons.

The Best Fitness Bands in India 2019

Fitness Bands have flooded the market with great quality wearable fitness trackers. They keep an eye on your vitals without costing a fortune. They count steps, keep track of your sleep and your step count to analyze your activity level. There are many brands in the market of Fitness Bands.

Our Top Picks are-

Moov Now

Moov Now is one of the most reliable fitness band in the industry. The group comes with the features like the excellent battery life of six months, sleep monitoring features and lightweight body. The only negatives with the band are GPS. It does not have embedded GPS technology, GPS is available when you connect it via your phone.

Samsung Gear Fit 2 Pro

Samsung Gear is the best fitness band in the market when compared price with features. The group has all the necessary features like heart rate monitor, 1.5 inches AMOLED screen, waterproof band, the battery life of 3 days and many more.

Huawei Band 2 Pro

Huawei Band is an excellent option for people with a modest budget. The band is sleek and lightweight. It offers a variety of trackers like heart rate monitor, activity tracking and battery life of 21 days. So if you need a fitness band with precise metrics, Huawei bands are a good option.

TomTom Spark 3

TomTom Spark 3 fitness band is a high-end fitness tracker that offers an array of features. The band provides the freedom of listening to music via fitness band. Pair your watch with your phone and download the songs on your watch. So if you are looking for an apt watch for gym time and does not mind spending 20k plus, you must opt for TomTom fitness band.

Amazfit Bip

Amazfit Bip is of the most stylish fitness band which is inspired by Apple watches. The band has a black and white screen and runs on its own software. It features include GPS tracker, waterproof body, activity and heart rate tracker, the battery life of 1 month.